Thursday, December 23, 2010

Merry Christmas 2010!

Hello everyone, I'm having Christmas blues right now. There's not much Christmas spirit in the air over here in Beijing. I'm missing my friends at my old workplace. Saddest thing is that it hasn't even started snowing here this year...

Mr Tofu and I will be heading down to IKEA later to buy some julmust, pepparkakor and chocolate almond cake to have our own little celebration at home tonight. ^ ^

Merry Christmas to all of you reading this!! ^ ^


This is a picture of my latest Christmas toy with the pandan plant that's struggling to survive the cold winter here ;)

Tuesday, December 7, 2010

Ji Dan Gao 鸡蛋糕 (Steamed Cake)

You can make this with the simplest ingredients that you can find in every kitchen ~ eggs, sugar, milk, self-raising flour. It's kinda amazing that no additional fat is needed. Plus, it's steamed and not baked, very healthy cake indeed...  ^__^

Aunty Ann, I did it!! ^ ^ The cake is very soft and moist. Thank you for sending me the recipe. I miss your (and Agnes') cooking all the time...


Ji Dan Gao 鸡蛋糕 (Steamed Cake)
(makes a 15cm/6 inch round cake)

Ingredients:
3 Eggs
120g Sugar
0.5tbsp Ovalette (optional)
50ml Milk
125g Self-raising flour, seived (or 125g Plain flour + 0.5tsp Double action baking powder)

Method:
* Beat eggs and sugar till pale yellow, light and fluffy.
* Mix milk into egg.
* Fold flour quickly into egg and milk batter.
* Steam on high heat for 15-20 minutes. 

Notes:
# The criss-cross cut on top of the cake was made when the skewer for doneness came out clean and 2 minutes before I turned off the fire, so there wasn't much "smiling" effect to speak of.
# Use of ovalette - Ovalette is an emulsifier/stabiliser commonly used in cake-making. It helps to strengthen the air bubbles in beaten eggs so that they can hold up during other steps of cake-making, eg, mixing in the flour. Other names for ovalette: sponge gel, cake emulsifier.
# Double acting baking powder - "Double" means "two stages" here. Stage one, air released immediately when baking powder comes into contact with water. Stage two, more air released when baking powder is exposed to heat (steaming/baking). Only Stage one happens in regular baking powder, so you have to be quick in mixing the flour and putting the cake into the pre-heated oven/steamer. With double acting baking powder, the batter can wait another 20 minutes for the heat. "Double" doesn't mean that the cake will rise twice as much as regular baking powder. :)
# Cake flour or Hong Kong flour will give this cake a softer and finer texture, use them instead if you have some in your kitchen. 
# When to add milk - Although the original recipe called for milk to be added after mixing the flour, I added mine before. Not sure it'll make any difference to the end product. If you know why, pls leave me a message. ^^

Monday, November 8, 2010

Japchae

Japchae (잡채), stir-fried noodles with vegetables, is one of the Korean dishes that most resembles Chinese cooking, especially my favourite Singaporean fried bee hoon.


The Korean restaurants in BJ has this dish translated as za cai (杂菜) on the menu and I always wonder if it's actually a noodle or a vegetable dish. Because, (1) nowhere in the name can you tell it's a noodle dish, and (2) the only 杂菜 or chap chye I've known all my life was this Nonya stir-fried vegetable dish.  Well, Prof Wiki's explanation also doesn't sound convincing:

The name, japchae, comprises the two hanja words; jap (hangul: 잡, hanja: , literally "mixed and stirred") and chae (hangul: 채, hanja: , literally "vegetables"). Therefore, japchae literally means "a mixture of vegetables."

My love for this dish comes from my love for tanghoon (冬粉) aka glass noodles. I heart dang hoon everywhere, with fishball soup, chap chye, claypot crab, steamboat, stir-fried thai style, etc, etc.

Surfing the net has also made me realise that almost every Asian country has her own cellophane noodle dish. In Korea, glass noodles are made of sweet potato starch and is called dangmyun (당면 or 唐麵). It has a more greyish shade because of the sweet potato starch content.


Korean dangmyun


Japchae (Korean stir-fried noodles)
(Serves 4)
Adapted from recipe by Korean food guru Maangchi. Besides posting the recipe of each dish, Maangchi also has a video of herself cooking on Youtube which is really useful for first timers like me.

Ingredients: 
250g Korean starch noodles "dangmyun"
150g Minced meat
1 bunch Spinach (washed and drained)
1 Carrot (cut into thin strips)
1 pkt White mushroom 金针菇 (seperated)
5 Dried shitake mushroom (soaked, drained & sliced thinly)
1 White onion (sliced thinly) 
3 cloves Garlic (chopped)
3 eggs (beaten, fried & sliced thinly)


Seasoning (the amounts can be changed according to your preference):
2-3tbsp Soya Sauce
1tbsp Sesame Oil
1-2tbsp Sugar
1-2tbsp Roasted sesame seeds

    Preparation (note that seasoning mentioned here is excluded in seasoning list above):
    * Blanch spinach. Dunk cooked spinach in cold water to retain fresh green colour. Drain spinach & squeeze out as much water as you can. Cut spinach into 2 inch length and mix it with 1/2 tbsp soya sauce and 1 tsp sesame oil (not included in Seasoning list above). Set this aside.
    * Fry carrot strips in 1/2tbsp oil till soft. Set aside.
    * Fry white mushroom in 1/2tbsp oil till soft. Set aside.
    * Fry onion slices in 1/2tbsp oil till soft and translucent. Set aside.
    * Fry chopped garlic in 1tbsp oil, add minced meat, sliced shitake mushroom and 1/2tsp pepper. Set aside when cooked. 

    Method:
    * Boil dangmyun till soft (takes about 3 minutes).
    * Drain cooked dangmyun, but don't wash it with cold water.
    * Add sugar and liquid seasonings into dangmyun and mix quickly and thoroughly.
    * Mix in all cooked ingredients.
    * Sprinkle roasted sesame onto japchae before serving.

    You can also reduce the number of ingredients to make simple japchae ^__^
    Here's a sample of simple japchae served as a side dish in a restaurant:

    Friday, July 9, 2010

    Wanton Noodles

    I had been neglecting this blog eversince I moved to Beijing.

    A bit of time spent getting used to a foreign land, a bit on finding a house with a decent kitchen, another bit on finding familiar ingredients... adds up to three months in total. Wow, that was a looooong time!


    But, I'm still not used to cooking Northern Chinese cuisine. This wanton noodle is a good example. Ingredients all from NTUC and hand-carried here (ya lah, I know yall think I'm crazy, but it feels really great to be able to enjoy these comfort food here ok?).


    Wanton Noodles (云吞面, 云=cloud  吞=swallow
    (serves 2) This is the Malaysian style of wanton noodles with dark soya sauce. I prefer this to the tomato ketchup or chilli sauce (Fei Fei's) version as I don't like my noodles to have a sweetish-sourish taste to them.

    Ingredients (wanton):
    100g Minced meat (with some fats)
    10pcs Prawns (shelled, de-veined and smash-chopped)
    0.5no Egg white
    1tbsp Cornstarch
    2tsp Soya sauce
    0.5tsp Salt
    Dash of Pepper
    1pkt Wanton skin

    Method:
    * Mix all ingredients (except wanton skin, of course) thoroughly and marinade for at least 2 hours.
    * Take half a teaspoon of the marinaded meat and put it onto one corner of the wanton skin.
    * Crumple the wanton skin such that all the meat is covered. Crumple just enough such that the meat doesn't fall out when you boil the wanton. Do not over-crumple the wanton skin cos you still want to enjoy the soft slurpy skin portion. And, remember, it's fun to be imperfect, the wanton would taste nicer if it's imperfect ;)
    * Boil 400ml of water in a pot, drop shaped wantons and remove once they float on top of the water. 


    Ingredients (noodles & vegetables):
    200-400g Chye sim (or any other chinese greens)
    100-150g Wanton noodles 

    Method:
    * Blanch chye sim and set aside.
    * Heat up 2 pots of of clean water.
    * When water rapidly boils in pot, add wanton noodles and stir with chopsticks to prevent noodles from sticking.
    * As soon as the noodles are done, remove them as fast as you can and submerge them in cold (tap) water. I usually do this over a running tap. This helps to make them chewy and springy.
    * Drain noodles and put them into the other pot of hot clean water. Just make sure to barely heat them up and not to cook them again.
    * Assemble the noodles, vegetables, wantons and sauce (recipe below) onto a plate.
    * Mix noodles thoroughly with sauce and you may eat them with soup (I didn't take a photo of the soup). 


    Ingredients (sauce):
    1tbsp Dark soya sauce
    1tbsp Light soya sauce
    1tbsp Oyster sauce
    2tsps Shallot oil (or 1 tsp sesame oil)
    2tsps Chilli paste (optional or ask you like) 

    Ingredients (soup - optional):
    600ml Water
    2tbsps Large (>5cm) anchovies (soaked)
    2pcs Pork ribs
    1stalk Spring onion (chopped) 

    Method:
    * Cook anchovies and pork ribs in water for 30 minutes to an hour.
    * Remove anchovies and pork ribs before serving.
    * Add cooked wantons and sprinkle chopped spring onions as a garnish. 

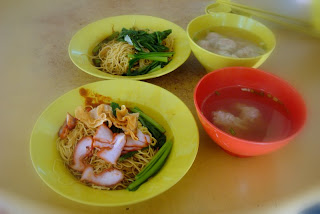
    The real thing, my weekly weeknd breakfast in SG. One is with char siew and fried wanton, and the other has all the wantons in soup. Guess which is mine? ^ ^

    Thursday, July 1, 2010

    Fried Carrot Cake


    Chai tow kuay ("fried carrot cake" in Teochew or Hokkien) ~ my all time favourite Singapore food. I remember my dad would occasionally ta-bao ("takeaway") this home for supper if he works late. My brother and I would hold our blunt toothpicks (the old-fashioned kind) and wait anxiously for mum to line the table with newspaper and open the ta-bao brown paper for us. The big pieces can be easily picked up by the toothpicks but I never liked them, what I liked were the salty, tasty small pieces of kuay and chai poh (salted radish), which can be quite challenging to pick up with those toothpicks (haha..). Sometimes I would mistaken the garlic as chai poh, but I still liked to try my luck and pick on those tiny pieces cos they had more flavour than the big ones. ^ ^

    It never occurred to me that I should ask my dad where he bought it from. But as an adult, I found my favourite chai tow kuay stall at North Bridge Road Hawker Centre. When I was working in town, Mr Tofu would send me to work every morning. We would drop by this hawker centre for breakfast whenever we had extra time to avoid the ERP. The carrot cake used to taste better, sometimes, the ah-em would leave the egg a little runny (not sure if it's intentional). But since the stall owners passed their skills to some not-so-young ah-bengs, it doesn't taste as good as before. Luckily, the ah bengs did not increase the price after they took over, so it still stays at a very low SGD1.50 per plate (you can't get this price anywhere else in Singapore!).

    Needless to say, one of the goodies that I 'imported' to Beijing is this packeted carrot cake (for stir-fry) from NTUC! ^ ^


    Chai Tow Kuay (Fried Carrot Cake头粿
    (serves 2)

    Ingredients:
    1pkt Ready-made carrot cake (cut into cubes)
    3cloves Garlic (chopped)
    1-2tbsp Chai poh (chopped)
    1-2tbsp Oil
    1tbsp Fish sauce (use regular soya sauce if you don't have this)
    1tsp Chilli paste (optional)
    3nos Egg (or 4 if you like)
    2stalks Spring onion (chopped)

    Method:
    * Fry garlic and chai poh till fragrant
    * Add carrot cake and pan-fry till least two faces of it is lightly browned and crispy
    * Drizzle fish sauce and chilli paste and stir fry thoroughly
    * Spread browned carrot cake evenly apart in pan
    * Beat eggs lightly and pour mixture over carrot cake
    * Flip carrot cake when egg is almost set (never mind if it's not a perfect flip, it's fun to be imperfect)
    * Sprinkle chopped spring onions as a garnish (I ran out of it)


    North Bridge Road ah beng's chai tow kuay ~


    Now that my 'imported' chai tow kuay is used up, I can only go to Lau Pa Sak restaurant to satisfy my cravings (^ ^)b


    Costs abt RMB35-40 per plate.

    Wednesday, June 9, 2010

    True Blue Peranakan Cuisine


    On a lazy afternoon, I was invited to this restaurant picked by my food-snob friends who were excellent cooks themselves. It was truly a great honour to be able to enjoy delicious true blue food with great friends who appreciate them.


    Random quotes from our conversation in this restaurant:
    "beautiful typical baba house deco"
    "see the intricate wood carvings, they are covered by real gold foil"
    "they have to get very thin waitresses cos only thin people will look nice in kebayas"
    "it is impossible to get this (good) taste when I cook this dish, only our mothers' and grandmothers' food can taste like that"
    "actually ayam buah keluah should be made with babi (pork), not chicken"
    "they are very smart, they don't use pork at all, then can cater to the tourists"
    "just eat, don't look at the price"


    By the waitresses:
    "the longan tea is free flow"
    "we can't make the gula melaka ondeh ondeh because we ran out of good quality gula melaka"
    "you can only takeaway food that doesn't have seafood in it coz we're worried that seafood will turn bad under SG's hot weather"
    "actually, yall can only take away the ayam buah keluak"


    Wednesday, April 28, 2010

    Wasabi Prawns

    I actually prepared this dish for a meal for 4-6 persons, but Mr Tofu invited another 2 guests over, so the guests ended up fighting for these yummy stuff.


    Recipe from here.


    Thursday, April 15, 2010

    Bittergourd with Beancurd, Egg & Minced Meat


    How to select less bitter bittergourds
    - choose those that are lighter shade of green
    - choose those with less bumps or uneven surface
    - choose local SG/MY bittergourds (those gigantic 20-30cm ones) instead of Japanese bittergourds (those tiny little 10cm ones)

    How to remove bitterness in bittergourds:
    - cut bittergourd into half, remove seeds, slice thinly
    - rub bittergourd slices with 2 teaspoons of salt, let the salt draw the bitter juices out
    - rinse thoroughly and squeeze out all water to remove the bitterness


    Stir-fried Bittergourd with Beancurd, Egg & Minced Meat

    Ingredients:
    1pc Bittergourd (prepared as per above to reduce bitterness)
    1clove Garlic (chopped)
    100g Beancurd (cut into cubes)
    100g Minced meat (marinated)
    1pinch Salt
    1no Egg + 1tbsp Water + 2tsps Soya sauce (beaten in a bowl)

    Method:
    * Marinade sliced bittergourd with salt for 30 minutes till bittergourd juice seeps out into bowl.
    * Rinse bittergourd several times to remove bitterness and salt.
    * Squeeze out excess water and bitter juices.
    (Steps 1-3 will help reduce the bitterness)

    * In a wok, fry garlic till slightly shrinked.
    * Add bean curd cubes and fry 3 sides of the cube (I prefer to leave the other 3 sides unbrowned to enjoy a softer texture of the beancurd).
    * Add minced meat and fry till 50% cooked.
    * Add bittergourd and salt. Stir fry and simmer with some water for the next 3 minutes.
    * Add egg mixture and simmer for 1-2 minutes (I like to eat the egg in chunks, so I usually let the egg sit and solidify).


    Had this dish in a Japanese restaurant called Satsuma Sochu Dining Bar in Gallery Hotel serving Okinawa cuisine with Blacktulip before she left for Sydney. I remember it costed at least SGD10 a dish. With this recipe post, Blacktulip, u can try making this simple and affordable dish for your bf! (^ ^)

    Thursday, April 8, 2010

    Gifts of Friendship

    Gifts full of love from my sweet colleagues...

    Multi-purpose chilli paste


    Dearest Agnes, I don't know what came onto me when you asked me what I wanted to eat before I leave, only one thing came to my mind - your CHILLI. You must had been shocked that I made this demanding request. When I saw this huge tub of chilli, I was so touched. You must had spent ages to make this. I will treasure this special gift.


    Iceless orange juice


    Dearest Miss Siew Fong Fong, thank you for the thoughtful hi-C drink. This is the most useful and practical gift I've ever received.


    Indonesian keropok
    [keropok photo] - will be uploaded soon

    Dearest Aunty Ann, yesterday my mum suggested that I could bring keropok to eat in Beijing. I told her my friend already gave me one packet. She said I'm a very lucky girl cos I'm doted by so many people. 


    Watching a variety programme on Channel U with my favourite boy bands of yesteryears dancing to their signature songs. To my dear idol 张克帆:你为什么会变成这样??咳。。。没关系啦,我也是。。呵呵。。。 :-D

    Thursday, April 1, 2010

    Kaya (easy slow cooker method)


    When I was buying the ingredients for making kaya in the supermarket, Mr Tofu was surprised that only four ingredients were needed. Yes, FOUR ~ eggs, coconut milk, sugar, pandan leaves. He was more surprised at how 'unhealthy' the ingredients were... hahaha.... like what gourmet chef 蔡澜 says, delicious food is never healthy ^ ^


    I used a mix of coconut cream and 'instant' coconut milk:


    People always say coconut milk is unhealthy due to the high cholesterol. But look at the label on both types of coconut milk:


    I would think it's more of the fat content that makes it unhealthy...  -____-


    The knotted pandan leaves ~ it's easier to knot them if the pandan leaves were split into 2 from the middle. Can you tell from this picture?


    Kaya (easy slow cooker method)
    (adapted from The Little Teochew)

    Ingredients:
    200ml coconut cream
    350ml coconut milk
    10 eggs, lightly beaten
    450g sugar
    10-20 pandan leaves (or 1 pkt of $0.45 NTUC pandan leaves)

    Method:

    * Wash pandan leaves throughly & wipe each blade dry with a cloth. Knot them.
    * Assemble all ingredients in a slow cooker.
    * Switch on slow cooker and stir mixture till sugar thoroughly dissolves.
    * Remove cover & stir mixture from the bottom every 30 minutes.
    * Cook for a total of 3-4 hours (i cooked only for 3 hours today).
    * Puree kaya mixture with a sieve.
    * Store pureed kaya into sterilised glass jars.


    This is how the kaya looks like after 3 hours of cooking. The pale green comes from the colour of the pandan leaves.


    The pureed kaya with the sterilised bottles. This recipe yields five bottles of kaya. Three bottles for friends, one bottle for mum, one for myself ^ ^


    That's my thumb for the comparison of G-brand Royal white bread (left) and Junior thick slice (right). I prefer Royal white, but there are only 5 slices in 1 packet... expensive...


    Spreading a thick layer of kaya....


    Besides butter, do you know that sliced cheese squares go very well with kaya? For me, I like to use the lighter tasting cheese so that it doesn't overpower the delicate fragrance of coconut & pandan leaves in the kaya ^ ^

    Saturday, March 13, 2010

    Peelers and Shredders


    After helping my colleaugue out with the preparation of Yu Sheng during Chinese new year, I became obssessed with peelers and shredders. With these wonderful tools, shredding is no longer limited to using shredded carrots used for adding colour to fried rice, noodles and vegetable dishes. Shredding will not limited to carrots alone! Ideas just kept popping out from my head...

    First, let me introduce the members of the "Peelers and Shredders" family (from left to right):
    - Suncraft Mama shredder ~ grey handle
    - Orika Mama shredder ~ orange handle
    - Orika Baby shredder ~ pink handle
    - Orika Papa peeler ~ steel handle

    Suncraft Mama shredder (SGD11.50) was the first one I bought when it was on 20% discount in TANGS cookware department. After trying it out, I found that the result was not what I wanted because the 'teeth' are spaced too far (4mm) apart:


    Close up on the blades (cuts 4mm x 2mm strip):


    After the Suncraft experience, I was more careful when looking for new shredders.

    At the Isetan private sale on Friday, I had the craziest time shopping for Japanese gadgets for my new kitchen. Suncraft and KAI both had 20%+10% discount ~ highest discount ever! I picked a couple of things, including a KAI shredder.

    Curiosity brought me to a demo counter where a girl in her late 20s was giving a demo on cutting up vegetables. This was exactly what I was looking for ~ fine-toothed shredders. And at an incredible price of SGD10.90 for a set of 3:


    Close up on Mama (4mm x 2mm) and Baby shredders (2mm x 2mm):


    Mama shredder can be used for shredding carrots and cucumbers for bibimbaps, turnips for spring rolls.

    Baby shredder can be used for shredding ginger for stir-frys, cucumber for salads and laying sashimi (like how they do it in Japanese restaurants).

    Buying 'unbranded' products does have its quality limitations. If you look at this picture, you will find that some of Mama's teeth (bottom of the picture) are crooked:


    Last to be introduced is Papa peeler. Papa peeler has a strong stainless steel body with sawed-toothed instead of a smooth blade. Salesgirl said these teeth are designed to give a strong grip to peel skins of harder fruits and vegetables, eg, potatoes, ginger, pineapples (she demo-ed with pineapples). It can also be used as a slicer ~ cucumbers, carrots, ginger, cabbage (thinly shredded cabbage can be use in coleslaw).


    A final family portrait ~ with blades lined up parallel for comparison:


    All these are going with me to Beijing this April...

    Sunday, March 7, 2010

    Pots and Pans


    Received this sms from Mr Tofu this morning:
    My China friend, got alot of lobang, cheap Zwilling pots and pans (RMB350), cheap quilt (RMB200), cheap Lenovo laptop, n cheap Timberland....

    Zwilling the 'stickman' brand? I tot Zwilling is a European knife-maker? Pardon me, I'm a sucker for Japanese products, so I haven't been noticing much of others.

    Surfing their website, the cheapest thing I found was a saucepan selling for £75. RMB350 is equivalent to £35, wow... that's 50% off the original price... I should make a trip down to TANGS basement to survey the prices this weekend.


    On a seperate note....
    I specially dressed my Poupeegirl (game character) up in comfy homey clothes, armed with a whisk in my hand, standing in a sweet lovely living room, representing me in my profile picture (top). This is my dream life... to cook everyday in a little sweet house with my beloved Mr Tofu. This dream will be coming true very very soon... in April... *squeals*   v (^____^) v

    Saturday, February 27, 2010

    Honeydew Sago


    Yuan xiao (元宵, teochew: 十五晚 chap ngo meh), the 15th day of the first lunar month, is both Lantern Festival and Valentine's Day for the Chinese. It also marks the last day of the Chinese New Year celebration. After meeting my relatives in my maternal grandma's house on the second day of new year, all the twelve aunties (including my mum) in the family will each cook up something and meet again to celebrate yuan xiao.

    Sago is made from the starchy juice extracted from the trunk of a palm tree in New Guinea. When uncooked, the dry sago pearls look like the tiny styrofoam balls that form a styrofoam board. When cooked, it expands to twice its original size, turns translucent, soft and chewy.

    The first time I had honeydew sago was during my primary school days. I remember eating it at a restaurant with my extended family for some celebration (either yuan xiao or my maternal grandma's birthday). The dessert (last dish) served was honeydew sago. Just like any typical restaurant, the dessert was brought to the table in a large serving bowl, then the waitress would scoop it into smaller bowls for our individual consumption. Both my cousin, YS, and I thought it was the most wonderful dessert we've ever tasted. We must have had at least two helpings then. ^^

    Made this for tonight's celebration. It has been a hot sunny day today, I'm sure my dessert will be a welcomed dish tonight ^^


    Honeydew Sago

    Ingredients

    One honeydew (or rockmelon), cut into cubes
    150ml/half to three-quarter cup Water
    300g Sugar*
    125g/half a packet Sago
    Lots of water (to boil sago)
    250ml Coconut milk
    1 litre Fresh milk
    Ice


    *Amount of sugar is approximately 20% the volume of liquids as water from the melted ice will further dilute the soup. My personal preference is 10-15%. without ice.


    Method:
    • Boil sugar with 100ml water till sugar thoroughly dissolves. Cool the mixture. (I usually do this the night before)
    • Boil sago in big pot of water for 5 minutes, constantly stirring. (sago is only 50% cooked through at this time)
    • Rinse half-cooked sago in tap water to remove the starch.
    • Boil sago in fresh water again for another 5 minutes, constantly stirring (sago should be 90% cooked through now, translucent with some bits of whites still in the middle. I usually stop at 90% because continue cooking till 100% will result in over-expansion in other 90% of the sago and cause them to become too soft and gooey).
    • Rinse sago in tap water again, till sago is completely cooled.
    • Quickly mix cooked sago with the liquids in a serving pot (I used my Endo thermal pot. Mixing them quickly will prevent cooked sago to lump and stick together.)
    • Add honeydew and lots of ice. Serve.

     90% cooked sago ~


    Brought a pot of honeydew sago to my niece's birthday party as well (I attended 2 gatherings tonight). Heard a guy murmuring "Yum yum" to his bowl of honeydew sago... I think he had at least 3 helpings just now... hahahaha... success! Yay! (^___^)v

    Wednesday, February 24, 2010

    Mini CNY Makan


    "Mini CNY Makan" ~ this was the title of the email invite that Agnes sent out to us. The makan session this afternoon was not mini at all, it was a BIG feast with lots of good food to enjoy. Agnes, Ann, Boss, Rachel and all, thank you for waking up at 4am to prepare these wonderful dishes  ^__^

    Yu sheng (鱼生) was the main highlight of today. There are three kinds of radishes in yu sheng: carrot, white radish, green radish. Green radish tastes fresh on the first bite, but slowly turns bitter and spicy after chewing on it more. Boss said that we should soak the shredded green radishes in water to remove the bitterness and spiciness.


    Yu Sheng ~ contributed by Agnes


    Chicken wings ~ contributed by Agnes, fried by Mag's maid
     

    Salmon teriyaki ~ contributed by Rachel


    Gyoza ~ contributed by Rachel


    Anti-clockwise (left to right)
    Fish cake ~ contributed by Margaret
    Meatballs ~ contributed by Agnes
    Chap chye ~ contributed by Boss


    Curry chicken ~ contributed by Ann


    Fried bee hoon ~ contributed by Ann


    Fried dry mee siam ~ contributed by Ann


    After looking at these pictures, Mr Tofu commented that we do anything but work. Sour grapes... Hahaha... ;)
    Related Posts with Thumbnails